EHD Issues and Aquatic Solutions
Every year hunters, deer enthusiasts, and deer farmers all worry about a well known disease that may or may not impact their deer herd. This disease we are talking about, is none other than Epizootic hemorrhagic disease or as most know it, EHD. Many have heard the abbreviation going around the hunting community, and the same individuals may not know the root of the causes or possible solutions that are out there. Most individuals simply sit back, and hope that this severe disease doesn't hit there herd. Well with a strong background in aquatics as well as deer biology a solution may be out there to help us sleep a little bit better at night.
History of EHD
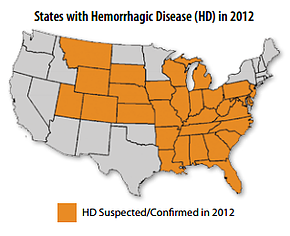
To really know how to cure EHD we must first know the history of it. EHD was first reported in 1955 in New Jersey, where 700 whitetails succumbed to the disease. The disease was once again reported in Alberta in 1962, where another 440 whitetails, 18 mule deer, and 13 pronghorn died. Fourteen years later in 1976 another large epidemic outbreak occurred where thousands of whitetails died from EHD in Nebraska, Wyoming, Kansas, New Jersey, and the Dakotas, and 4000 antelope died in Wyoming. (Matschke, G.H., Trainer, D.O., et. al. "Population Influences" chapter, p. 174, in White-tailed Deer: Ecology and Management, Edited by Lowell K. Halls, Stackpole Books, 1984, ISBN 0-8117-0486-6). Though these outbreaks may seem very dated to you, the most recent severe cases were in the years 2007 and 2012 according to the QDMA'S annual whitetail report. In 2007 the Southeastern Cooperative Wildlife Disease Study (SCWDS) reports indicated 65,000+ whitetails died of this disease in a total of 31 states. Only a short five (5) years later in 2012 the herd was once again impacted in a total of 30 states with a total of 14,032 wild deer reported dead from EHD in Michigan alone! You may find yourself asking yourself, what is causing EHD to be so terrible some years and not so bad the next. Well we must now take a turn from the tragic consequences to what is the root of this evil.
Every year hunters, deer enthusiasts, and deer farmers all worry about a well known disease that may or may not impact their deer herd. This disease we are talking about, is none other than Epizootic hemorrhagic disease or as most know it, EHD. Many have heard the abbreviation going around the hunting community, and the same individuals may not know the root of the causes or possible solutions that are out there. Most individuals simply sit back, and hope that this severe disease doesn't hit there herd. Well with a strong background in aquatics as well as deer biology a solution may be out there to help us sleep a little bit better at night.
History of EHD
To really know how to cure EHD we must first know the history of it. EHD was first reported in 1955 in New Jersey, where 700 whitetails succumbed to the disease. The disease was once again reported in Alberta in 1962, where another 440 whitetails, 18 mule deer, and 13 pronghorn died. Fourteen years later in 1976 another large epidemic outbreak occurred where thousands of whitetails died from EHD in Nebraska, Wyoming, Kansas, New Jersey, and the Dakotas, and 4000 antelope died in Wyoming. (Matschke, G.H., Trainer, D.O., et. al. "Population Influences" chapter, p. 174, in White-tailed Deer: Ecology and Management, Edited by Lowell K. Halls, Stackpole Books, 1984, ISBN 0-8117-0486-6). Though these outbreaks may seem very dated to you, the most recent severe cases were in the years 2007 and 2012 according to the QDMA'S annual whitetail report. In 2007 the Southeastern Cooperative Wildlife Disease Study (SCWDS) reports indicated 65,000+ whitetails died of this disease in a total of 31 states. Only a short five (5) years later in 2012 the herd was once again impacted in a total of 30 states with a total of 14,032 wild deer reported dead from EHD in Michigan alone! You may find yourself asking yourself, what is causing EHD to be so terrible some years and not so bad the next. Well we must now take a turn from the tragic consequences to what is the root of this evil.
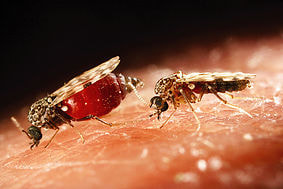
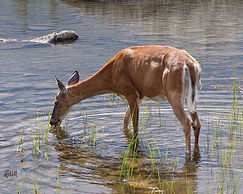
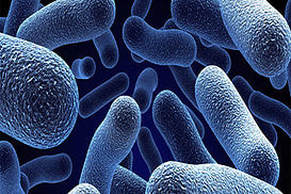
This root of evil we speak of is a tiny little flying bug belonging to the genusCulicoides. These small midges pack a punch when they bite, and the reports certainly prove it. The main species of this genus causing most of these issues is Culicoides sonorensis; in which Ed Schmidtmann, a researcher with the Arthropod-Borne Animal Diseases Research Unit, part of the USDA Agricultural Research Service researched very closely (Thomas, Lindsay, Jr. "Can We Prevent EHD?" Web blog post. Quality Deer Management Association. N.p., 30 Mar. 2013. Web). As indicated in Lindsay's article published on the QDMA's website, this genus of insects has one flaw that overlaps with the expertise of an aquatic biologist. This overlap is that of water quality. Culicoides particularly loves shallow, warm, organic rich, and salty bodies of water. What does this scenario remind you of the most? How about that of that shallow "wildlife pond" that you see many of your deer drinking in or maybe that nasty cattle pond that deer come to grab a dawn or dusk drink from.
Now you may be asking yourself, "Well why does the midge love this environment?". Well the answer is quite simple. Unlike beneficial aquatic invertebrates (both macro and micro) which typically are a sign of great water quality, the midge carrying EHD is not one for competition. When a water source's quality; whether a cattle trough, mud hole, wildlife pond, etcetera, degrades many of these beneficial invertebrates cannot survive in the new conditions thus reducing competition. With this new, unhealthy environment present the midge thrives, and lays eggs like a mad person. They prefer salty conditions as well, as they have a high tolerance for this conditions unlike its invertebrate and insect friends who typically have a very small tolerance for salty conditions. You may be asking yourself why is salt going into these water sources. Two words; Mineral Supplements. Not that mineral substances are bad, but having a salt block or mineral lick leaching into a pond can kill beneficial organisms which in turn will make a perfect habitat for Culicoides. A poorly managed water body builds the perfect homestead for the midge and for an increase in EHD potential. This is why water resource management is key to helping reduce this drastic disease.
Now you may be asking yourself, "Well why does the midge love this environment?". Well the answer is quite simple. Unlike beneficial aquatic invertebrates (both macro and micro) which typically are a sign of great water quality, the midge carrying EHD is not one for competition. When a water source's quality; whether a cattle trough, mud hole, wildlife pond, etcetera, degrades many of these beneficial invertebrates cannot survive in the new conditions thus reducing competition. With this new, unhealthy environment present the midge thrives, and lays eggs like a mad person. They prefer salty conditions as well, as they have a high tolerance for this conditions unlike its invertebrate and insect friends who typically have a very small tolerance for salty conditions. You may be asking yourself why is salt going into these water sources. Two words; Mineral Supplements. Not that mineral substances are bad, but having a salt block or mineral lick leaching into a pond can kill beneficial organisms which in turn will make a perfect habitat for Culicoides. A poorly managed water body builds the perfect homestead for the midge and for an increase in EHD potential. This is why water resource management is key to helping reduce this drastic disease.
Water Resource and Pond Management
Given that we have narrowed down the perfect spot for these nasty little midge flies, we can now put a water resource management perspective on this ongoing, annual epidemic. As Ed Schimdtmann noted in his previous teaching, Culicoides is a creature that thrives in degraded water resources. The limnological term this is referring to is eutrophication. A eutrophic water body is one that is high in nutrients (phosphorus, nitrogen), high in organics, and full of vegetation (more common in a pond or lake environment). Professional pond and lake managers deal with water bodies on a daily basis that exhibit these three items, and in some cases at frightening amounts.
However, dealing with water bodies such as these, we can put the same aquatic biology and management directly towards that of our deer herds. For the past few years I have directly researched and studied water quality throughout many water systems across the state of Wisconsin. The underlying issue for most of these waterbodies is the natural process of any lake, pond, and/or reservoir wanting to fill itself in. This is all part of the eutrohpication cycle. As the water body ages; sediments, organics, and overall biomass collect in the basin which over time will decrease the water volume, and increase the nutrient richness of the water body. Many may think that once a water body's health is degraded that the only solution is to dredge or clean out, but many management tools exist to turn around that watering hole on your property.
The process of turning around an unhealthy pond begins with ensuring that there is a balance in the water. This balance is created with the correct abundance and combination of beneficial aquatic plants, benthic and columnized bacterium, and water conditions that are within water quality standards. The tools to create this balance are a concept that is easy to grasp once broken apart. To begin creating this so called "balance" in the water we must take a deeper look each specific part of what creates the balance.
Aquatic Plants
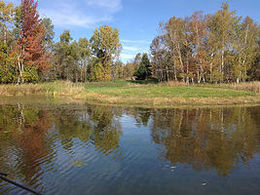
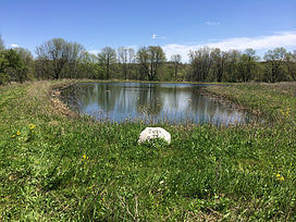
One of the greatest systems in the world for creating a healthy water environment is that of a wetland. As described by the Environmental Protection Agency (E.P.A.); "Wetlands are part of the foundation of our nation's water resources and are vital to the health of waterways and communities that are downstream. Wetlands feed downstream waters, trap floodwaters, recharge groundwater supplies, remove pollution, and provide fish and wildlife habitat". Pond and lake biologists across the nation understand the strong correlation between aquatic plants and the water body they surround. These plants draw their nutrients not only from the ground, but also from the water source that they grow within.
Aquatic Plants
One of the greatest systems in the world for creating a healthy water environment is that of a wetland. As described by the Environmental Protection Agency (E.P.A.); "Wetlands are part of the foundation of our nation's water resources and are vital to the health of waterways and communities that are downstream. Wetlands feed downstream waters, trap floodwaters, recharge groundwater supplies, remove pollution, and provide fish and wildlife habitat". Pond and lake biologists across the nation understand the strong correlation between aquatic plants and the water body they surround. These plants draw their nutrients not only from the ground, but also from the water source that they grow within.
As stated in the E.P.A.'s wetland definition, a wetland removes pollution. You may ask yourself, "Well how is a wetland removing pollution?". The answer to this question is quite simple based on limnology and the study of aquatic vascular plants. As organics, suspended solids, heavy metals, and general nutrients enter a water body they essentially fill the area much like food dye does when put in a glass of water. As these nutrients move around plants readily take up the nutrients to help grow, thus removing them from the water. Plants throughout the entire growing season will continually uptake these nutrients, organics, and suspended solids until they blossom, seed out, and decompose at the tail end of the growing season. In summary you can think of an aquatic plant kind of like a bank. To begin your year you put money into the bank where it is kept safe and away from being given to anything outside, but once you are ready to release that money at the end of the time frame it is once again in the open where it can be used by other sources.

The basics of why plants in a water scenario is one thing, but now knowing what plants to install around and/or in your pond is the next step. Many native species currently grow in the continental U.S., but there are also a lot of invasive and/or exotic species that many may think will benefit them. There are two plants that I consider to be the cream of the crop.
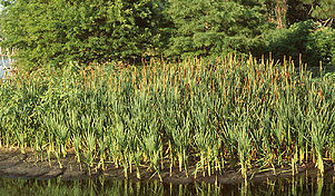
The first plant is one we are all very familiar with, and that is the native broadleaf cattail (Typha latifolia). The cattail in many states is the base of the wetland, and when it comes to uptaking nutrients and pollutants from a water body there is no plant that does it better. One thing to know is that there is another cattail species that can be misidentified as being the broadleaf cattail, and that is the native narrow leaved cattail (Typha angustifolia). This species is much more aggressive, and tends to overtake systems, whereas the broadleaf cattail is a less aggressive and more stable plant due to its sheath/leaf size. Regardless of which cattail does come into your water source they are both a great form of cover and shelter for whitetail deer, turkeys, and waterfowl. Just as a native prairie helps to protect these species, so does a stand of thick cattails. You probably have seen the hunting videos where they are sitting over a barren pond with no vegetation. Certainly deer come to these to drink, but just imagine if now they had a way to go into this water area, and also have a sense of security. Now you have not only a plant helping clarify and improve water quality conditions to prevent EHD, but also providing a better setup for your hunting in the fall.
The first plant is one we are all very familiar with, and that is the native broadleaf cattail (Typha latifolia). The cattail in many states is the base of the wetland, and when it comes to uptaking nutrients and pollutants from a water body there is no plant that does it better. One thing to know is that there is another cattail species that can be misidentified as being the broadleaf cattail, and that is the native narrow leaved cattail (Typha angustifolia). This species is much more aggressive, and tends to overtake systems, whereas the broadleaf cattail is a less aggressive and more stable plant due to its sheath/leaf size. Regardless of which cattail does come into your water source they are both a great form of cover and shelter for whitetail deer, turkeys, and waterfowl. Just as a native prairie helps to protect these species, so does a stand of thick cattails. You probably have seen the hunting videos where they are sitting over a barren pond with no vegetation. Certainly deer come to these to drink, but just imagine if now they had a way to go into this water area, and also have a sense of security. Now you have not only a plant helping clarify and improve water quality conditions to prevent EHD, but also providing a better setup for your hunting in the fall.
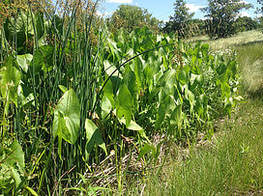
The second plant I speak of has two advantages to any water system. The first is the same as the broadleaf cattail as it uptakes a great amount of nutrients thus improving water quality conditions and reducing EHD risk. The second advantage of this plant is that it is a preferred food source for whitetail deer. The plant I speak of is none other than the aquatic vascular plant, broadleaf arrowhead (Sagittaria latifolia) or also known as duck potato. Arrowhead is a great indicator of how nutrient rich a water body is. In many aquatic systems across the states of Wisconsin and Illinois we have seen arrowhead growing. Some systems exhibit small plants of only 12-16 inches, whereas others I have seen grow up to four (4) feet tall. The height is strongly dependent on the water body's nutrient level. The more nutrients available, the larger the plant gets. Now obviously the larger the plant the more tonnage available for the deer to consume. On many of my clients properties I have specifically planted these plants around ponds for added nutrient uptake, but just to find that the deer have been eating them almost daily according to the landowners. Deer love these plants for their tender shoots, tubers, and seed heads. The best name to give these plants instead of duck potato would be the aquatic food plot.
A combination of these species as well as other native, beneficial, and aquatic vascular plants will help to keep nutrients levels down, water quality parameters in check, improve cover around your water holes, and provide a source of nutrition. Now that the plants are settled we must take that microscope and dive deeper and smaller to see the next part of the EHD reduction equation.
A combination of these species as well as other native, beneficial, and aquatic vascular plants will help to keep nutrients levels down, water quality parameters in check, improve cover around your water holes, and provide a source of nutrition. Now that the plants are settled we must take that microscope and dive deeper and smaller to see the next part of the EHD reduction equation.
Beneficial Bacteria and Enzymatic Processes
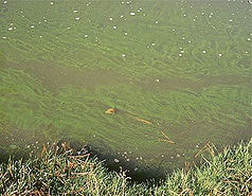
You may ask yourself, "What does bacteria do to keep my deer from getting EHD?". The answer is quite simple. The aquatic midge fly (Culicoides) thrives in aquatic ecosystems that are unhealthy due to the limited competetion with other insects and invertebrates. The correlation simply goes the the fact that in high drought years ponds are typically in high demand but in low supply. The decrease in water depth, increase in heat, and increase in deer herd activity in these pools dramatically decreases the overall water quality. These waters tend to have planktonic algal blooms, high turbidity, and lack of beneficial invertebrates and/or bacteria making a perfect breeding center for Culicoides.
When the aquatic ecosystem is in a sense "damaged" you must start from the beginning to regain the water quality and clarity of the system. A process that is overlooked in most aquatic ecosystems is down at the microscopic level. When taking care of an animal that is higher in the food chain, you must also make sure that all is taken care of at the first part of the food chain being the microbial bacteria. Beneficial bacteria and enzymes occur in all parts of the animal kingdom and are needed to ensure that life goes on as we know it. This is especially key when speaking of an aquatic ecosystem. Life in a pond, lake, or river begins at the water and sediment interface at the bottom of the water body. At this interface we observe many different species of bacteria working on nitrification, denitrification, ammonification, oxidation, reduction, and the list goes on and on. Maintaining a healthy bacteria community will help ensure that the water quality is maintained.
Bacteria are work machines when it comes to maintaining an aquatic ecosystem. However, they need to be set up to succeed. The way that this is done is by the addition of water quality enzymes. Enzymes are simply a catalyst that increases the speed of a biological process. The human body has many enzymes to help get us through our daily activities. What enzymes do in an aquatic ecosystem is help in the decomposition of organic materials. The organic materials that reside in these systems may be dead organisms, leaves, feces, or even decyaing algae. The enzymes target these organics and begin breaking them down in simple sugars such as fructose, glocse, and sucrose. These simple sugars are what the beneficial bacteria need to thrive, reproduce, and grow. The more sugars present in the ecosystems the harder and more efficient the bacteria will work.
What will the bacteria be working on? Organics! The bacteria will begin to remediate the organics by converting these once unhealthy substances into a combination of oxygen (O2), carbon dioxide (CO2), and water (H20) thus eliminating the potentially harmful organics from the ecosystem. With these organics being remediated out of the environment the main breeding and living space of the midge is slowly removed. The aquatic midge (Culicoides) prefers a high organic rich environment which you may know as "muck" in a waterbody. If you can remove the preferred breeding area, you can reduce the population potential that the midge could achieve. With a decreased population threshold you will also improve the possiblity of making an environment that encourages beneficial invertebrates (both macro and micro) and aquatic insects making this improved water body their living area. With the right ingredients added (bacteria and enzymes) the sky is the limit with increasing the water quality of your water sources, and increasing the competition that the midge fly will have.
What will the bacteria be working on? Organics! The bacteria will begin to remediate the organics by converting these once unhealthy substances into a combination of oxygen (O2), carbon dioxide (CO2), and water (H20) thus eliminating the potentially harmful organics from the ecosystem. With these organics being remediated out of the environment the main breeding and living space of the midge is slowly removed. The aquatic midge (Culicoides) prefers a high organic rich environment which you may know as "muck" in a waterbody. If you can remove the preferred breeding area, you can reduce the population potential that the midge could achieve. With a decreased population threshold you will also improve the possiblity of making an environment that encourages beneficial invertebrates (both macro and micro) and aquatic insects making this improved water body their living area. With the right ingredients added (bacteria and enzymes) the sky is the limit with increasing the water quality of your water sources, and increasing the competition that the midge fly will have.
Proper Pond Design & Synthetic Liner Installation
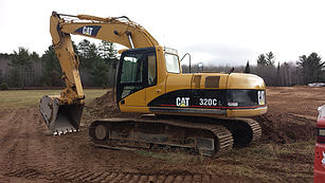
Most deer breeders and hunters alike typically think that all you need to make a watering hole for their animals is an excavator and an area to dig a hole in the ground. However, this is not the case when creating a healthy water source. The aquatic midge thrives in water sources that are shallow, have a degraded water quality, and have a soft and organic bank to breed in and around. The main rule of thumb when creating a pond, lake, or water source is that the more water you have the easier it is to manage. Why you ask? The simple answer is that when a water body increases in size and depth the heating and cooling potential dramatically decreases.
The easy way to think about temperature of water compared to water body size is of a swimming pool. As summer progresses along you may begin thinking that the weather is nice and warm so it should be time for a swim. However, as you jump into that pool in May you get shocked with a very cool sensation rushing over to you as the water has not heated up to the same temperatue as the air around you. Now on the flip side you may go on that same day and play in a puddle which may be exhibiting equal if not higher temperatures than that of the air. Making sure to keep the comparison of water temperature to water body size and depth will help you realize why those shallow puddles you may have created could be a midge fly threshold.
A properly designed water hole/wildlife pond should have steep slopes, but keeping in mind that a deer should still be able to walk in and out of the pond rather easily to avoid stress on the animal. A 3 to 1 slope is typically a safe bet to not only give the deer an easy access in and out of the pond, but also be able to establish beneficial aquatic plants. In addition to the slope making sure the pond reaches a proper depth is very important. To help with management of the pond a depth of 4+ feet should be achieved. This would make the pond 24 feet in diameter. To increase the depth you will either have to make a larger diameter pond or increase your end slope in areas of the pond. In summary the deeper and more steep you make the pond the easier it is to manage.
Now that you understand the design of the pond you must now look at how the pond will hold water, and how to reduce the amount of muck/soil that the midge can breed in. In many areas across the Midwest it can be hard to find a spring to maintain your water level. In those cases a synthetic liner can be your savior. Not only will the synthetic liner help maintain water, but it will also eliminate the loose muck/sediment that the midge needs to breed and reproduce. Typically a material that is 24 mil or greater is sufficient in holding water meanwhile being strong enough to prevent rips/tears from deer hooves. Furthermore, unlike the typical bentonite clay that people have used to hold water in their ponds/waterholes, the synthetic liner does not leak as easy, and leaks are much easier to locate and repair.
The Catch-22 to this idea is that having a full functioning ecosystem is still key in maintaining superior water quality. To achieve this goal a layer of sand is recommended to be placed on top of the liner. This will help become the planting substrate for your beneficial aquatic plants. The sand will also help to cushion the liner and create a substance in which wildlife can walk freely on with reduced or non-existent slipping. The last item the sand will help with is in prevention of UV rays hitting the liner which would breakdown the plastic of the liner.
Putting Together the Whole Idea
Water resource management for prevention of EHD is not a single concept, but rather a collection of different strategies. Treating your water source more like a living breathing organism rather than just a hole in the ground will help you gain more control of your management plan and the ecosystem as a whole. With whitetails, elk, mulies, pronghorn, and many other animals being the passion of so many we must do what we can to help battle EHD in our herds. If you take the time this season to manage your current water holes and design your new watering holes according the the information provided here you can help increase your effectiveness as a conservationist and land manager.
For more information regarding managing the water bodies on your property or installing a new one, please email info@creekbottomlandmgmt.com or visit our pond and lake management partner Wisconsin Lake & Pond Resource's website at www.WisconsinLPR.com.

 RSS Feed